Wednesday, May 14, 2014

trebuchet case studies

Jason Solomon                                                                                                                                5/9/14

Trebuchet counterweight case studies


I am researching a counterweight trebuchet. The things works when you put the projectiles in the sling and the weight is on the same arm at the other end. When you let go of the arm the weight carries it down and the arm swings and releases the projectiles. It is like a seesaw when you hold the lighter end. You let it go and the heavy side goes down. I wont to work on this because I think this is easy to accomplish and it puts a lot of force and velocity into the arm when you shoot the projectiles.


Case Study #1 Lindsey and her family
 
 First the group had to overcome what was  getting past the formidable defenses - a 6-foot high wooden fence with reinforced gate. This lead to the 5.85m  high counterweight being installed and the trebuchet including an added 2m of sling. The positives are that it gives us a good example of a counterweight that works, easy design modeling, and gives good perspective on a strong base. Negatives are it is to big for us to build, not enough information on how they built it, and we don't have the time to build it.
http://www.instructables.com/id/The-Insensible-a-counterweight-trebuchet/


Case Study #2 Luc Viatour


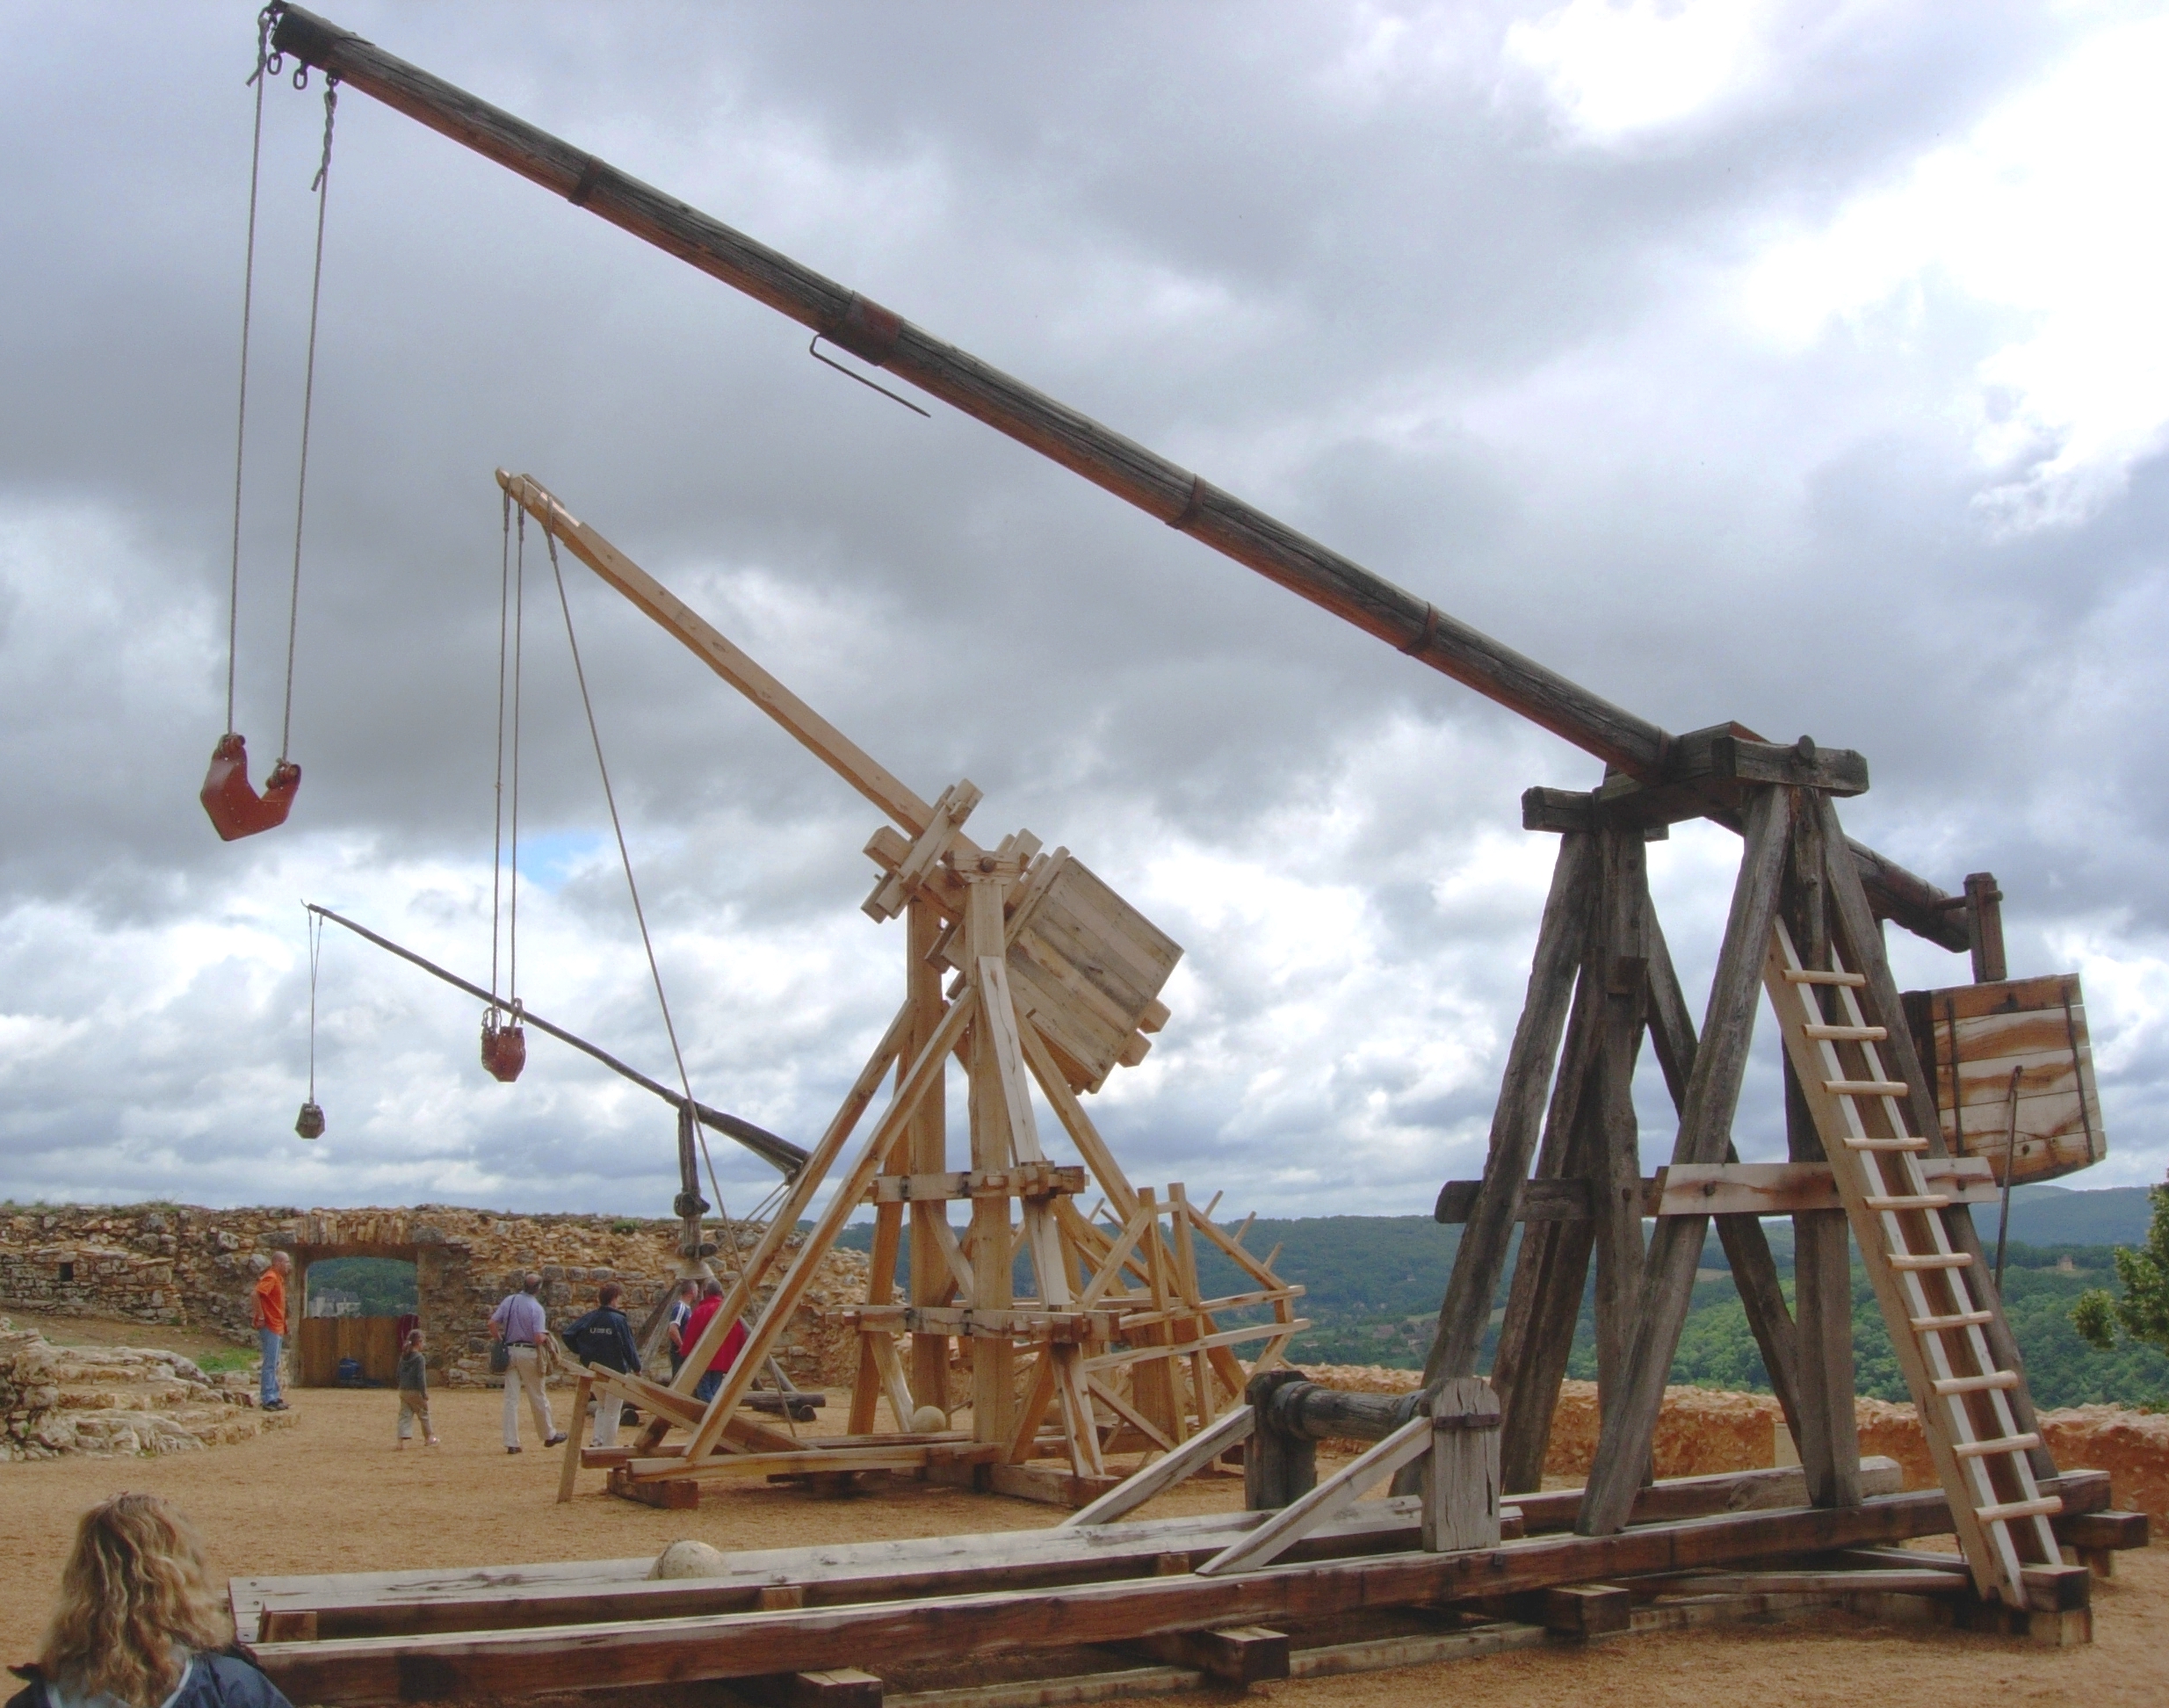
 The dimensions are2,469 × 1,944.
The positive are good perspective on the counterweight use, well designed, and good strong foundation. Negatives are to big for us to build, no building instructions, and no feedback on the design.  


Monday, May 5, 2014

sumobot

Jason Solomon                                                                                                                               5/5/14

                                                                   Sumobot Blog


The project requirements for the sumobot was to build a running car with the parts that were given to us by Mr. Atkins in the box of stuff. We built up the project with motors and batteries and got the control box to run the course. We ran the course in two minutes and twenty four seconds and that was 60% of our grade. We made our design of McDonalds because we had most of our colors red and Steve came up with the idea.

My group came in third place out of five. RDJ came in first followed by John Deer then Ronald (my group) then ASAP Fury and last but not least, Bloody Mary.

We would make our wheels perfectly straight and not be able to move at all. The front wheel would have more traction so it could turn. That was the problem with my groups project. We had speed but not torque on our wheels. Plus our gear drive project was worth it we just need to fix the torque and have a better distribution of weight on our project.

Tuesday, April 8, 2014

yo-yo project

Jason Solomon                                                                                                                                4/8/14


Blog on yo-yo        


 My group was Troy Joey and I and we made a yo-yo with a optical illusion attached to it. Our illusion made the colors blue and orange and these are complementary colors. We first made two circles with the drill press and we made them the same size. Then we took a rod and glued the two circles together with the rod attached to it. Then we had to attach a rob to the yo-yo so we can make it spin to make the illusion. Our group performed a good yo-yo and we achieved our task.

Our group did create a optical illusion and we did succeed in using the color theory in it. The colors we made in the illusion were blue and orange. Many groups also achieved their goals and overall this project was a success for our class. A lot of interesting and creative designs were made.

My group could have improved our project if we had more time. We wanted to make a smaller and less weighted circles for the yo-yo. Our string was a big struggle and if affected the outcome of our project. We needed to get a smaller string and it would have created more spin for our illusion. 

Thursday, January 23, 2014

Fastener Blog

Jason Solomon                                                                                                                             1/24/14

Fastener Blog


This project we had to work in groups. My group was Troy, Joey, and me. We had to use fasteners to hold blocks of would together. A fastener is something that hold two or more objects together. My groups fastener was magnets. We had to come up with designs to use the magnets. We came up with a person.
 
My group did achieve success in this project. The goal was to use our fastener and keep the blocks together. We had our person stand up and the wood did stay together with the magnets holding in place. We had so difficulties in our project such as we had to cut down the wait to make it not as top heavy. Also it was hard to keep the person stand up do to the legs were not as stable. But overall we got the person to stand and used the magnets correctly.
 
The group that was successful was Matt Munez's group. They used wooden pegs to hold up blocks of would and built of a pyramid. Factors that led up to their success was that the pegs were more stable then the other fasteners and the bottom of the pyramid was easy to make. We can use this project in future ones because we will need to keep more than one object together and we will use other fasteners to make it stable. We need to learn from all projects because it helps us better in each project we do


Tuesday, December 31, 2013

Compound Machines

Jason Solomon                                                                                                                            12/31/13
 
Build A Compound Machine


Our groups were first assigned to make certain machines and create the best mechanical advantage as possible. Very shortly after this we had to combine some of the machines together to create the best and highest mechanical advantage as possible again. With this Mr. Atkins set up a chart of advantages we had to come to if we wanted to get a certain grade. We ended up with a B+ and we had an advantage of like 27 or 28. Overall our project was a success and we achieve a high mechanical advantage of the combination of machines.
 
Like I stated before my group ended up with a mechanical advantage of 27 or 28. This was a B+. That is a decent grade but compared to the rest of the groups were in the middle of the pack. Many groups exceeded the mechanical advantage and went over 30 and got the A+. Even though we did a good job the other groups did better. We used a wheel and axel and a lever and pulled the lever up the with wheel and axel. We made  big wheel so the spin had more advantage. Our problem was that we could of built more machines to have a higher advantage like the other groups.
 
I learned that many machines can benefit from each other and come together to make a good mechanical advantage. The most difficult concept to grasp doing this was how to come up with a better advantage and Mr. Atkins needed to help us a little to figure it out. In the future in projects we could use the combination of machines to benefit the other machines we will build and help give a better mechanical advantage.

Monday, December 9, 2013

Simple Machines

JasonSolomon                                                                                                                                     12/9/13


Simple Machines
 
 
The project we did was that we had to build simple machines to create a mechanical advantage. We had to get certain measurements to build the machines. We had to hold or pull weight on each machine and we had to build four machines. The mechanical advantage of three of the machines had to be six, and the pulley had to have a mechanical advantage of two. They were a lever, wheel and axle, incline plane, and pulley. Many groups created the machines but did not fulfill the task of creating their machines to have a mechanical advantage. This projet was the building block to others that we will build in this class and it will help us build them and measure how we can get the best mechanical advantage in each project we build.
 
As you can see this is a wheel and axle that Joey built.


This is a incline plane that i built
This is a pulley that joey and i
attempted to build


I built this lever in me and joey's try to win the the cubcakes


My group finished in like last place in every machine except for the incline plane. We could not get a good mechainical advantage on either of the projects. My group struggled to understand how to get it done. Plus one of our group members was out the whole time we were building the machines to get mechanical advantage better. We should have payed attention to get a better project with advantage and looks. The final winner was Rob's groups. They had the highest and best machines in mechanical advantage and effiecency.
 
We lost efficiency because of the measurments of the projects could be off and this really afftected the outcome of our project. For example if your leaver where you wanted to put the weight and measure could really afftect the outcome. Plus if your incline plane was to steep it you make your efficeincy much lower. My group could have been  more accurate in measurements and understanding and how to create a good project. Now that our group is back together we can create a more well balanced efficient project with our knowledge on mechanical advantage now.


Tuesday, November 12, 2013


Jason Solomon

11/12/13

6 Simple Machines
 
 
6 Machines
Lever
Pulley
Wedge
Wheel and Axel
Incline Plane
Screws
 
We can reduce this to 4 because you can combine wheel and axel with screws because they are all parts that are added to inventions. Also we can combine Incline plane with a a Pulley becuase they both can add to pull together. Now this is reduced to 4 groups with Lever, Pulley and Incline Plane, Wedge, and Screws Wheel and Axel.